Can I Bend Images in Design Space
Learn how to use Cricut Design Space with this easy to follow tutorial.

This post is sponsored by Cricut. All thoughts and opinions are mine alone.
We get hundreds of questions every week in our Cricut Support and Joy Help Groups! The majority of the questions usually have to do with some aspect of design space. Either how to do a certain thing, why am I getting this error message or even just how in the world do I use Cricut Design Space! Today I am going to answer all those questions in one place! We will go over everything from how to install Cricut Design Space, how to use Cricut Design Space (including all the features and capabilities) and more! Let's go ahead and get started with the most popular questions!
Cricut Design Space FAQ
Q: What devices and computers can I use Design Space on?
A: One of the great things about Design Space is you can access it and use it on just about any device! Laptop, desktop, chromebook, phone, tablet, you name it! Some devices (like your phone, tablet and chromebook) you will have to download the Cricut Design Space app while others you can download Design Space right to your computer. For more information on specific requirements to run Design Space, and to see if your device is compatible, check out this guide .
Q: Do I have to pay for Cricut Design Space?
A: There is no cost to use Cricut Design Space. There are some images and designs (including licensed designs from Disney, Marvel, Martha Stewart and more) that you may need to pay for it is free to use the Design Space program. If you'd like to be able to create with the most fonts and design options, you may want to consider signing up for a Cricut Access membership. To learn more about Cricut Access including the different costs and benefits, check out this post .
Q: Do I have to be connected to the internet to use Design Space?
A: Nope! There are some features, like the ability to save projects and share them, that you need to be online to do, but the majority of the functions in Design Space can be done offline.
Q: Can I use Design Space on multiple devices?
A: Yes, you definitely can! Just use your Cricut login information on each device and you'll be able to design, save projects and access saved projects on every device. NOTE – if you use an uploaded font, that font will only appear on devices that have that same font downloaded. Uploaded images (including SVG, JPG and PNG files) are available on every device you are logged in to.
Q: Can I share my Design Space projects with others?
A: Yes and no. If your design only uses Cricut images/fonts/shapes/etc. it can be easily shared with others. When you click the project in your main menu, click COPY PROJECT LINK, and then share that link with friends and family. If your design includes uploaded images, it is not able to to be shared.
Q: I'm missing some features in Design Space OR Design Space isn't working for me, why?
A: Most of the time if you are missing features or if your Design Space isn't loading properly it is because your app may be out of date. If you're on a mobile device, check in your app store to see if there is a new update available. If you're using the desktop app, new updates will be downloaded automatically. NOTE – there are some features that are not available on the mobile apps (like curving text, knife blade and foil tip). To see the full list of features and which ones are and are not included, check out this chart .
How To Use Cricut Design Space
The hardest part of using Design Space is choosing your designs and/or fonts! There are SO many options available within Design Space and there is no limit to the amount of designs and fonts you can upload to use as well! Below we will go over each feature in Design Space and give you a basic overview of what each one does and how/when you would use it!

What Projects Are In Design Space?
There are hundreds and hundreds of ready to make projects available in Design Space. When you first open Design Space you'll see a collection of projects you've made and saved as well as Cricut Access projects, Ready To Make Projects, Cricut Community projects and more!
You can also search for projects by materials type, occasion, keywords and more. To search projects, click the VIEW ALL button next to the category and type your search term in the the top search bar.

Can You Use Your Own Images and Fonts in Design Space?
Yes you definitely can! Like I mentioned earlier, images you upload to Design Space are available on any and all devices you are logged into. However, fonts are only available if you have the font downloaded on your device. So if you design a project on your desktop with a font you install, and then open that project on your phone, it will only show that font if you have it downloaded on your phone. If you don't, it will default to Cricut Sans.
Learn how to upload images on your the desktop app here . Learn how to upload fonts on your computer to use in Design Space here .
Check out this video to learn how to upload images on the iOS app. This video will show you how to get fonts on the iOS app.

How To Use Templates
Templates are a really neat feature that allows you to add an example of what you're going to be making to the Design Space canvas to help you get a better idea of size and layout for your design. To use the templates:
Select the type of project you're making (apron, tshirt, banner, etc) THERE ARE OVER 100 TEMPLATES TO CHOOSE FROM!

Click TEMPLATE in the left tool bar.

Change the size and/or style on Design Space canvas.

Create your design!
Templates are for reference only.
How To Add Images To Design Space Canvas
With over 100,000 images available to use (plus any that you upload and add on your own), images are probably the most versatile feature in Design Space. There are new images being added weekly too, so that number is only going to grow!

To see all the images, and add them to your canvas click IMAGES in the left tool bar.
You can search for a specific image or you can browse categories.

Once you have picked a category, or entered a search term, you can narrow down the results even more with filters. Filters include:

- Cricut Access – images inclued with your Access membership. Note you can use these images even if you don't have Cricut Access, but they may have a fee associated with them. NOTE – once you buy an image or font it is yours to use as much or as often as you like!
- Project Type – Cards, Mandalas, Phrases, etc.
- Operation Type – Cut, Draw, Print Then Cut (what type of project the image is best used for)
- Image Complexity – Simple, Moderate, Complex (how many lines or layers determines the image complexity. A design with lots of layers will be moderate or complex while a single layer design will be simple)
- Layers – Single or Multi
- Ownership – Uploaded, Purchased, Free, Downloaded
- Brand – Disney, Marvel, Sanrio, Warner Bros, etc.
- Material – Vinyl, Iron-On, Infusible Ink, Paper, etc. (what type of material will work best for each image)
- Language – English, Spanish, French, etc.

Once you've found your image(s), you can select multiple at the same time, click INSERT IMAGES to add them to your canvas.
How To Add Text To Design Space Canvas

Adding text to your canvas is as easy as clicking a button! In the left toolbar, click the TEXT icon and a text box will pop up for you to enter your text. Don't be fooled into thinking just because it's easy there are not a lot of customization options because there are a TON! Let's take a look at a simple phrase like WELCOME and all the ways you can customize it.

Once you have your text added, you'll have a new menu up at the top of your canvas. The first thing you can change is the FONT. When you click the font drop down menu, you'll see a full list of all fonts available as well as some filter options. Note fonts with a green a next to them are included with Cricut Access.

- ALL – the default setting will show you all fonts available, including ones you've uploaded.
- SYSTEM – this will show ONLY fonts you've uploaded.
- CRICUT – this will show ONLY fonts in Cricut Design Space
- FILTER – You can filter fonts by their cut type:
- My Fonts – fonts you have uploaded on your computer
- Multi Layer – fonts that have more than one layer. These are like university or varsity fonts that have a background layer included.
- Single Layer – fonts with just one layer.
- Writing – fonts that are have a writing option for the DRAW feature NOTE – if you are going to be using pens to write with your Cricut, you'll want to filter your fonts for writing. If you use a font that doesn't have a writing layer it will draw the letters in bubble letters.
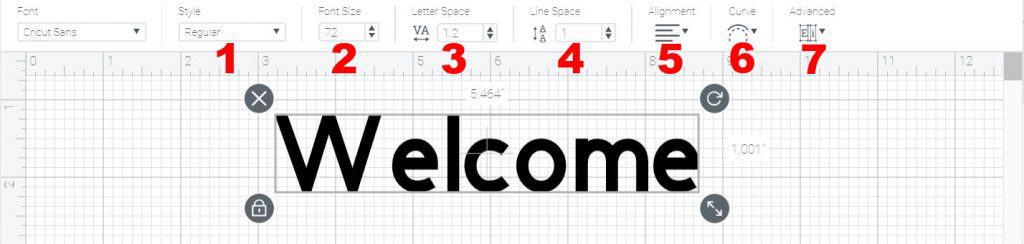
1- The next option you have is the STYLE menu. This is where you can pick regular, bold or italic.
2- Font Size – This allows you to change the font size.
3- Letter Space – This allows you to change the space of the letters. This is especially helpful on script fonts where your letters are not connected. Changing the spacing to smaller than 1 or 0 makes it so your letters are connected.
4 -Line Space – If you are working with multiple lines of text, this feature allows you to change the spacing between the lines.
5- Alignment – If you are working with multiple lines of text, this feature allows you to line your text up either centered or to the left or right.
6- Curve – ONLY WORKS WITH SINGLE LINE TEXT. Curve your text up or down.
7- Advanced – Allows you to un-group your letters to move them around individually.

How To Add Shapes to Design Space
Want to add a basic shape to your design? There's a button for that! In the left tool bar under the text button is the SHAPE button. This allows you to add one of 9 basic shapes and/or a score line (score lines are added when you want to score a project to make it easier to fold, like cards or boxes). If you want to add a shape you don't see in this menu, you can search shapes in the IMAGES button too.

How To Upload To Design Space
The UPLOAD button in the left tool bar allows you to upload your own images into Design Space. You can upload images (must be a .jpg, .png, .gif, .bmp, .svg or .dxf file type) OR a pattern fill. Pattern fills are often used for print then cut projects. To learn more about these different options, file types and how to upload images, check out this post .

Top Toolbar Explained
The top toolbar has a lot of drop down menus and features! Some are pretty self explanatory while others may be more complex. Let's look at each feature and what it does:
- Undo and Redo – the first two arrows allow you to undo your last step or redo a step you have undone.
- LINETYPE – This box determines what your Cricut machine will do with your design. Some options aren't available for all machine types (i.e. perf, engrave, deboss, wave are only available for Maker machines)
- The box next to the linetype drop down changes the color of the selected layer. It's helpful to have your design be the same, or similar, color to what you'll be cutting or drawing, especially if you're working with a design that has multiple colors. This way it will be easier to know what color to load on your mat when it's time to cut.
- FILL – This box will be used only when you are doing a PRINT THEN CUT project. Learn more about print then cut and how to use this box in this post.
- SELECT ALL – allows you to select everything on your canvas. This can be helpful when attaching, welding or grouping images together.
- EDIT – This feature allows you to cut, copy and paste designs from one canvas to another
- ALIGN – allows you to line up multiple layers either left, right, top, bottom, centered horizontally, vertically or center
- FLIP – allows you to flip your image/text either horizontally or vertically.
- SIZE – This feature allows you to change the individual or overall size both width and height. You can change them both or change each one individually by clicking the lock button.
- ROTATE – allows you to rotate your text/image.
- POSITION – This feature lets you move where your image/text is on the canvas along the X and Y axis.

What Is The Layers Panel?
The Layers Panel is the toolbar on the far right side. This is where you can see all the different parts of your design individually. The layers panel tells you alot about the parts of your design(s) on the canvas.

- Image Name – If you're using an image it will say the name. If you have text added, it will give you the font name.
- Cut Type – Next to the preview of the image, it will tell you what your Cricut will do with the design (cut, draw, print, etc)
- Visibility – On the far right is an eyeball. This allows you to hide from the canvas a part of the design. NOTE – if part of your design has visibility off (there is a slash through the eye), it will not be cut/drawn when you click make it.
There are also a lot of features in the layers panel that make creating helpful! Let's start with the top of the layers panel.

Top Layers Toolbar
- Color Sync – This allows you to sync your colors so that you have fewer cuts. This is especially helpful if you're working with lots of images that have different variations of the same color (like 2-3 different reds). You can drag and drop the colors so that all the reds cut together on the same mat.
- Group – Allows you to group multiple layers together. NOTE – the Group function does not attach the designs together, so when you click MAKE IT Design Space will optimize the space and line things up so you have the least amount of wasted material. If you want it to cut how it looks on the canvas, you'll want to use the ATTACH feature (more on this below).
- Ungroup – This feature undoes the group option so that you can change individual layers on their own.
- Duplicate – Make a copy of one or more layers.
- Delete – Delete the selected layer(s) from the canvas.
At the bottom of the Layers Panel is another toolbar with some of my favorite features in Design Space! Let's take a look at what you can do here!

Bottom Layers Toolbar
- Slice – This feature allows you to slice two images. This is helpful when creating stencils or anything where you want the larger part of the design to stay intact and want to remove a smaller part. NOTE – you can only slice TWO layers, so if you have a design with multiple layers, you can only slice two of the layers at a time.
- Weld – Here you can permanently attach multiple layers together. This is helpful when you are working with script fonts, or when you have a multi color image you want to keep like colors together.
- Attach – Like weld, but not permanent. This allows you to attach multiple pieces of a design together. NOTE – when you attach a design, if there are multiple colors, everything will turn one color. Check out the video below to learn the difference between weld and attach and when to use each feature.
- Flatten – You will use this feature when you are working with a print then cut image. The flatten feature allows you to flatten a design together so that only the outside perimeter of the design is cut out vs. every part of the design.
- Contour – This is a really neat feature that allows you to remove single lines in a design. This is helpful if you have overlapping pieces or if you want to have certain parts of a design removed from the design.
How To Save and Share Projects
I highly suggest saving your project(s) several times throughout your design process. That way if your computer shuts down, or if design space freezes, you don't lose all your work. To do this, just click SAVE in the top right corner. You can name your project whatever you want and then click SAVE. If you want to save a copy of a design you have previously saved, you can click SAVE AS to create a second copy.

If you want to share your designs, click MY PROJECTS to see a full list of your projects. Next, click the share button (triangle with circles) in the bottom left of the project and then COPY PROJECT LINK. NOTE – Only projects that use Cricut images and fonts can be saved.

How To Make Projects
Once you have your design created it's time to send your project to your Cricut to be cut/drawn/engraved/debossed/etc. The first thing you'll want to do is click the green MAKE IT button in the top right corner. NOTE- Make sure you have the right machine selected before clicking Make It. It will show what machine you have selected next to the MAKE IT button.

Prepare Screen Explained
The first screen you'll see is the PREPARE screen. This will show you how many mats you will have cut and what each mat will have on it. The number of mats is determined by both the number of different colors you have as well as how big your project is.
At the top of the mat menu on the left side, you can also change the number of copies you want to make. This is especially helpful when you're making multiples of the same project.

Let's talk about what you can change and need to know on each mat.
- Next to the preview it will tell you what your Cricut is going to do with this mat (cut/draw/print/etc)
- Material Size – You can change the size of the material you are going to be cutting.
- Mirror – You'll want to use this feature when working with iron-on vinyl or infusible ink. This flips the design so that it is basically backwards

You can change the position of your design on the mat. To do this, click your design on the large preview mat and drag it to where you want. If you want to rotate your design, select the arrow button in the top right of the design and drag your design to the angle you want. You can also move your design to another mat or hide it completely by clicking the the three circles in the top left corner of the design.
Once you have everything selected and/or moved how you want it, click the CONTINUE button in the bottom right corner.

FOR JOY USERS ONLY
If you are using a Joy, you will also see a pop up on this screen asking how you want to cut your design.
- Without Mat – For Smart materials only where you will be cutting without a mat.
- On Mat – for any material you will be loading on a mat to cut.
- On Card Mat – when you are making cards with the Card Mat
- Multiple Ways – If you are going to be cutting some materials without a mat, some with a mat, with a card mat or any combination of the three.

Make Screen Explained
The next screen is where you will tell Design Space exactly how you want your Cricut machine to cut your design. The first thing you need to do is connect your Cricut machine to Design Space. If you have one machine this will happen automatically; if you have multiple machines, you'll need to select which machine you want from the drop down menu at the top.
Next, you'll select what material you are cutting. If you don't see the material you're using in the favorites list, click Browse All Materials in the right corner to see a full list of compatible materials for your machine.
You can click the star next to the material type in the browse materials menu to add it to the favorite menu and have it pop up every time. This is really helpful if you have a certain material you use on a regular basis.

Once you have your material selected, Design Space will prompt you to what tool(s) you need to have loaded in your machine. Once you have your tool(s) loaded and your material on your mat, click the flashing arrow button on your Cricut to load your mat.

Lastly, you'll be prompted to press the flashing C button to have your Cricut machine start cutting your project. FAST MODE – some materials allow you to cut them at 2x the speed. This is a great option for larger designs but I avoid doing this with intricate designs so that the cuts don't get messed up.
Cricut Design Space Explained
I hope this helps you demystify Design Space and all the features and capabilites. If you're more of a visual learner, check out my Design Space YouTube playlist here to see all the latest videos and tutorials for Design Space.
If you have any questions I didn't answer, please leave them in the comments below and I'll get back to you as soon as I can. Make sure to subscribe to my YouTube channel to check out all the video tutorials. For more Cricut projects and tutorials, check out these posts. For tips, tricks and immediate help, be sure to join our FREE Cricut Support Group.
Can I Bend Images in Design Space
Source: https://tastefullyfrugal.org/how-to-use-cricut-design-space/
0 Response to "Can I Bend Images in Design Space"
Post a Comment